Sunday, January 31, 2010

Simply Delicious Double Chocolate Brownies


Double Chocolate Brownies are the answer to many of life's questions. Or at least the questions I hear: "When are you going to make some goodies to send to me?" (from my bachelor friend who moved away) "Do we have anything good to eat that isn't healthy?" (from my daughter) and "I need chocolate" (technically not a question, but something my body screams at me from time to time).

The fantastic thing about these brownies, aside from their taste, is that you probably have everything you need to make them in your pantry right now. My question to you: What are you waiting for?

Simply Delicious Double Chocolate Brownies
Makes 24 brownies

1 cup butter
2 1/4 cups sugar
1 1/4 cups cocoa powder
1/2 teaspoon salt (1 teaspoon if you're using unsalted butter)
1 teaspoon baking powder
1 tablespoon vanilla extract
4 large eggs
1 1/2 cups unbleached all-purpose flour
2 cups semisweet chocolate chips

Lightly grease a 9x13 pan. Preheat oven to 350 degrees.

Melt the butter in the microwave or in a saucepan over low heat. Stir in the sugar and return to the heat briefly, just until it's hot and the sugar has begun to dissolve into the butter. Transfer the butter and sugar mixture to a mixing bowl.

Stir the cocoa powder, salt and baking powder together. Add them to the butter-sugar mixture and mix until combined. Add the vanilla and eggs and beat the mixture until it's smooth. Add the flour and the chocolate chips, mixing again until well combined. Scrape the batter into the prepared pan.

Bake for 25 - 30 minutes, or until a toothpick inserted in the center of the brownies comes out with just a couple of crumbs clinging to it. The brownies should feel set on the edges and in the center. Cool completely before cutting and serving.

Saturday, January 30, 2010

Mediterranean Salad


Half of my lunch is ready, so while I wait for my chicken breasts to cook, I thought I'd share this delicious, healthy salad with you.

I found the recipe in Cooking Light and made it for my Thursday client. It was so good, I knew I'd be making it again this weekend for myself. I'm a big fan of fresh fennel, especially when it's sliced paper thin like in this salad.

I tweaked the dressing a bit, and today I left off the feta cheese; I simply forgot to buy it, and I really don't miss it. But if you like feta, and can remember to buy it, please do add it to the salad.

Time for lunch.

Mediterranean Salad
Makes 8 servings

3 tablespoons red wine vinegar
2 tablespoons water
1 teaspoon dried oregano
1 teaspoon black pepper
1 teaspoon dijon mustard
1/2 teaspoon kosher salt
1 cloves garlic -- pressed
4 tablespoons olive oil
1 fennel bulb -- sliced thin, about 2 cups, use mandolin
1/2 red onion -- sliced thin, about 1 1/2 cups, use mandolin
1 cup pitted kalamata olives -- halved
3/4 cup fresh parsley -- chopped
1/4 cup feta cheese -- crumbled
1 15 ounce can cannelini beans -- drained, rinsed
12 cherry tomato -- halved

Make vinaigrette by combining red wine vinegar through olive oil.

Layer the rest of the ingredients in a bowl.

Before serving (an hour before if possible), toss ingredients with dressing.

Sunday, January 24, 2010

The Dinner Buffet


When my kids were little, one night I said we were having "Odds and Ends" for dinner. That meant I didn't have a plan, my husband was working late, and we were going to have whatever I had on hand. So I emptied the fridge, put everything on the counter, and let them pick and choose what they'd like. Wouldn't you know, "Odds and Ends" became a requested meal.

I think it was fun for them to decide what to put on their plates. I liked it because I had a bit of control (I offered healthy foods like fresh fruit, raw vegetables, cheese sticks, bread, whatever cooked protein I had around, and leftover pasta or rice), it was easy to prepare, and it helped use up the odds and ends.

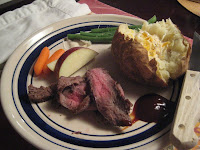
My kids are older now and not as easily amused, so tonight I said we were having a Dinner Buffet. My main motivation was that I wanted to use up several slices of meatloaf and half a cooked flank steak from the freezer; there wasn't enough of either one for a family meal, but on the buffet, we had plenty for everyone.

It worked like a charm, and before you could say "odds and ends," the four of us were filling our plates with meat, freshly baked potatoes, green beans and other fruits and vegetables from the buffet.

Sometimes making (and eating) a healthy meal is easier than you'd think.

Saturday, January 23, 2010

Pantry Challenge and Banana Bread


I'm starting to see some space in the freezer after using most of the pork, beef, ground turkey and chicken I had lurking in there. Four boys sleeping over last night also helped: we no longer have cupcakes, most of the freshly baked cookies, dinner rolls, pasta sauce, frozen waffles or breakfast sausage bogging us down.

Tonight we're off to the neighborhood Progressive Dinner Party, so I won't be cooking at home (though I had leftover pasta and broccoli from last night's dinner for lunch today). But I've got next week's menu all figured out, using more pantry and freezer items supplemented by the fresh vegetables I bought yesterday. And here's the really cool thing: After deducting the cost of the ingredients I bought to make my dishes for the progressive dinner, I realized the weekly groceries for my family of 4 cost about $50.

In the spirit of frugality, I decided to bake some banana bread with the four overripe bananas in the fruit bowl. The recipe I used comes from Jessica Seinfeld's Deceptively Delicious cookbook, in which she hides various fruit and vegetable purees into foods that you'd like your kids to eat. Some of the recipes are good, others are questionable (I didn't enjoy the spinach in her Blueberry Oatmeal Bars). But I like her banana bread recipe; it's not as dense as some others I've tried, and it's easy to make.

Banana Bread
Makes 1 loaf
Adapted from Deceptively Delicious by Jessica Seinfeld

3/4 cup whole wheat flour
1/2 cup all-purpose flour
1/2 teaspoon baking soda
1/4 teaspoon baking powder
1/2 teaspoon salt
1/2 teaspoon cinnamon
1/2 cup light brown sugar
1/4 cup canola oil
1 large egg
1 large egg white
5 bananas, pureed
1 teaspoon pure vanilla extract

Preheat oven to 350 degrees. Coat a 9x5 loaf pan with nonstick cooking spray.

Mix the flours with the baking soda, baking powder, salt and cinnamon and set aside.

In a large mixing bowl, mix the sugar and oil with a wooden spoon until well combined. Mix in the egg, egg white, banana puree and vanilla. Add the flour mixture and mix just until combined.

Pour the batter into the loaf pan and bake until a toothpick inserted in the center comes out clean, 55 to 60 minutes. Let cool at least 5 - 10 minutes before turning bread out onto a rack to cool completely. When cool, store in a plastic bag in the fridge.

Friday, January 22, 2010

Become a Fan!

Thank you to my friend and fellow blogger Amy Casey of Dinners for a Year and Beyond for cluing me in to the "Followers" feature, which I've just added to my blog (look over to the right, under the Blog Archive list). I'd love to have you join my little fan club!

Update on the Pantry Challenge:

Last night was Taco Night, which pleased everyone and took care of a package of ground turkey from the freezer, a package of taco shells (I buy them in bulk at BJs) and a can of refried beans.

I've also been baking, so we now have fresh snickerdoodles, frozen snickerdoodles and a loaf of banana bread. Stop by; I'd be happy to share!

Wednesday, January 20, 2010

Pantry Challenge, Day 3: Bacon-Wrapped Pork Tenderloin + Sides


I'm enjoying this challenge immensely and have been gratified and humbled by the realization that I have so much perfectly good food right here in my house. When I look around after three days, I don't see noticeably less food, even though I eat three meals a day (and lots of snacks) here. In fact, with a trip to the supermarket for more fresh produce and some milk over the weekend, I might continue the challenge for another week.

The rest of the family remains unimpressed with the experiment. In fact, certain family members have been ordering take-out at an unprecedented rate, which may explain why it's taking me so long to make a dent in the larder. But it's only Day 3. The plan for tonight was bacon-wrapped pork tenderloin (already cooked and in the freezer) jazzed up with a fruity side dish, as well as another vegetable and a potato.

I had a couple of Gala apples and half a sweet onion in the refrigerator, so I sliced them and drizzled with vegetable oil, salt and pepper, and convection roasted them for about 15 minutes. When the apples were just getting tender and the onion slices were starting to char, I took the pan out of the oven and tossed the mixture with a capful of apple cider vinegar and two spoonfuls of Caramel Apple Butter. A few leaves of thyme and the fruity side dish was done. (I don't usually have Caramel Apple Butter, but it was in a gift basket I received over the holidays, so why not put it to use?)

My vegetable was lightly boiled carrots, one of the few vegetables I had left in the drawer, tossed with butter, salt and pepper. I also prepared the remainder of a box of instant Garlic Mashed potatoes I had in the pantry. Judging from the empty plates, I think dinner was better than the latest round of takeout.

Tuesday, January 19, 2010

Sloppy Turkey Joes in Hash Brown Cups


I interrupt the Pantry Challenge to bring you a cute AND delicious dish I made for today's special diet client.

If you read my blog a lot (I can't imagine there are many of you), you may remember that my every-other-Tuesday client is not only gluten-free and dairy-free, she doesn't eat red meat, vinegar (except rice vinegar), nuts, seeds, legumes, refined sugar or raw vegetables. No problemo.

Today's idea was completely inspired by and ripped off from fellow Personal Chef Patti Anastasia. I took Patti's idea and ran with it, substituting ground turkey for the beef, rice vinegar for the apple cider vinegar, and making a few other tweaks as I went along. The result was so tasty I have to share with you.

Update (Jan. 25, 2009): Just got an email from the client saying how much she loved these. You must try them NOW!

Sloppy Turkey Joes in Hash Brown Cups
Makes 8 filled hash brown cups, enough for 4 - 6 servings

Find Patti's recipe here.

Hash Brown Crust:
2 bags frozen hash browns -- thawed (we like Alexia brand)
2 tablespoons cornstarch
1/2 teaspoon onion powder
1/2 teaspoon garlic powder
1 teaspoon salt
3 tablespoons melted butter or vegetable oil
8 4-1/2 inch aluminum tart pans

Sloppy Joes:
1 3/4 pounds 93% lean ground turkey (not turkey breast please!!)
1 onion -- chopped
3 cloves garlic -- minced
1/4 cup rice vinegar
1 can tomato paste
1/4 can tomato sauce
1 tablespoon dried Italian seasoning
2 tablespoon agave nectar (if you can have sugar, use an equal amount of light brown sugar instead)
2 tablespoons apple juice, optional
3/4 cup shredded soy cheese (use sharp cheddar if you eat dairy)

To prepare crusts: Preheat oven to 450. If potatoes aren't completely thawed, put them on a cookie sheet or in an aluminum pan and pop them in the oven for a couple of minutes while it's preheating to finish the thawing process.

Toss the hash browns with the cornstarch, spices, and butter or oil. Spray nonstick spray in tart pans and place them on a cookie sheet. Press a heaping 1/2 cup of hash browns into the bottom and sides of pie pans. You want to make a 1/4-inch thick crust. Bake for 25-30 minutes, or until golden. Watch carefully! The baking time is dependent on how much moisture is in your potatoes. Keep your eye on them, they may take less or more time.

While the crusts are baking, prepare the Sloppy Joe mixture: Heat a nonstick skillet over medium-high heat until hot. Saute turkey in a bit of olive oil until it begins to brown. Add onion, and when it's almost cooked, garlic. Add vinegar, tomato paste, tomato sauce, seasoning and sweetener of choice. Cook, uncovered, over medium heat for 10 minutes, or until slightly thickened; stirring frequently. Taste, adjust seasoning. To make them more tangy, add more vinegar. To make them sweeter, add brown sugar or some apple juice. Spoon meat mixture into crusts. If desired, top each pie with 2 tablespoons shredded cheese. Bake 10 minutes and serve.

Monday, January 18, 2010

Pantry Challenge, Day 1: Wraps and Vegs


Today marked the first day of the "Cook What You've Got Challenge," and I was ready! Well, I thought I was ready, until I realized the quantity of chicken I had in the freezer did not equal the number of mouths I had to feed. But I didn't let that stop me from being creative.

I arrived home from my client's house at about 1:30 today, whereupon I found my son still asleep. After waking him and having him shovel the front walkway, he asked for breakfast, specifically, three hash browns and two fried eggs. He ate that at about 2 pm, and I realized he wouldn't be hungry for dinner. Good, because by then I knew about my chicken deficit.

My vague idea for dinner involved the cooked chicken from the freezer as well as some spoils from today's cookdate: half a can of black beans, half a can of tomatoes with green chiles and half an avocado. I warmed the chicken in a skillet and added the black beans and some of the tomatoes as well as a squirt of barbecue sauce. I rolled the chicken and black bean mixture up in three flour tortillas, topped it with the rest of the canned tomatoes and baked it for 15 minutes. Then I uncovered the dish, topped it with some shredded cheese and baked it for 5 more minutes. Dinner was ready. And can I say, my husband remarked THREE times, "This is really good."

Side dishes were easy: carrot and celery sticks leftover from hubby's Chicken Wing run last night, a bowl of grapes from the fridge and a scoop of avocado salsa I made from the half an avocado and some vegetables in the drawer.

Day 2 won't be as exciting: Tuesday is dance (DD - 5:30 - 7:30 pm) and yoga (me - 7 - 8:30 pm) night, so everyone fends for themselves at different times of the evening. But I'll be back after Day 3 with another new meal from the pantry.

Sunday, January 17, 2010

Penne Rigate with Spicy Braised Swordfish


The pasta recipes in this month's Food and Wine have been calling to me. Last night I prepared the Penne Rigate with Spicy Braised Swordfish and was incredibly pleased with the results, even though I forgot to buy one ingredient, anchovies. No, I didn't forget them on purpose. I really like anchovies; but even if you don't, use them. You see, their little secret is that if you put them in a saute pan with some olive oil and cook for 30 seconds or so, they just plain dissolve, leaving just a mysterious, salty flavor in their wake. Next time, I won't forget the anchovies.

I was worried about using two whole jalapenos; the jalapenos at my market are huge, so I only bought and used one, and it was ample. I liked the way the cooked jalapeno mellowed and provided a subtle heat throughout the sauce. It wasn't as "in your face" as it is in salsa and other raw dishes.

The braised swordfish was tender and flavorful; in fact, the only criticism this dish received was from my husband, who wished there was more swordfish on his portion.

Here's the recipe, copied straight from Food and Wine, with my notes in parentheses.

Penne Rigate with Spicy Braised Swordfish
Recipe by Marcia Kiesel, Food and Wine magazine
Serves 4
Total time: 50 minutes (It took more like 30 minutes, tops)

The tomato sauce here—with big pieces of flaked swordfish and slivers of jalapeño—gets nicely absorbed by the penne. And, judge Michael Schlow adds, "There's a good proportion of tomatoes and fish to pasta, and it all comes together so well."

1 tablespoon salt-packed capers (I used regular capers, rinsed)
3 tablespoons extra-virgin olive oil
6 garlic cloves, thinly sliced
2 large jalapeños, thinly sliced (I used one jalapeno, which was plenty for us)
6 large anchovy fillets, minced (I forgot to buy the anchovies)
1/2 cup dry white wine (or chicken stock if you don't use wine)
One 28-ounce can whole tomatoes, chopped and juices reserved
1/2 pound penne rigate (I used Barilla Plus)
1/2 pound skinless swordfish steak
Salt and freshly ground pepper
2 tablespoons chopped basil (I was out of basil from my pesto making)
2 tablespoons chopped parsley

Directions
In a bowl, cover the capers with warm water. Let stand for 20 minutes; drain. (This is if you're using the salt-packed capers. Just rinse regular capers.)

In a skillet, heat the olive oil. Add the garlic and jalapeños and cook over moderate heat until the garlic is golden, about 3 minutes. Add the anchovies and cook, mashing, until dissolved, about 30 seconds. Add the white wine and simmer over moderately high heat for 2 minutes. Add the tomatoes and their juices and simmer until slightly thickened, about 5 minutes.

In a large pot of boiling salted water, cook the penne until al dente. Drain.

Season the fish with salt and pepper and add to the sauce along with the capers. Cover and cook over low heat, turning once, until the fish is just cooked through and can be flaked into large, moist pieces, about 8 minutes. Transfer the fish to a plate. (Taste the sauce and) season with salt and pepper. Add the penne to the sauce and simmer over low heat for 1 minute, stirring. Spoon the pasta and sauce into bowls and top with the flaked swordfish. Garnish with the basil and parsley and serve.

Saturday, January 16, 2010

Pantry Throwdown!


Main pantry area

Cereal and "extras" pantry

Upstairs freezer


Basement freezer

When my personal chef friend Tami Mitchell came up with the idea for a "Cook with What You've Got Challenge," I was in! I've been trying to deplete the freezer inventory since New Year's, and been doing an admirable job of it, but I'd slacked off a little bit lately. My insatiable desire to try every new recipe I run across means I rarely make the same dish twice here at home, and I cook most evenings. When we have leftovers, I package them up and freeze them, thinking we'll eat them one night in the future. But then I end up making something new the next night, and the next, and so on. So we never get to the freezer meals, and they're starting to accumulate.

In addition, I have a pretty well-stocked pantry. When I make the occasional run to Trader Joe's, I stock up on the items we like so I'll have them around. When I make the too-frequent BJ's trip, ditto, only in massive quantities. And when a family favorite is on sale at my grocery store, I buy a few as well. The result, as you can see above, is enough food to feed a small country. I didn't take a picture of my baking cupboard, but since I'm not that much of a baker, it contains only the staples like flour, sugar, vanilla and chocolate chips.

So Tami offered the challenge to cook for a week (or more) from the things you have in your home. She allows one trip to the store for produce and dairy. I'm planning to do that today, and there are just two recipes I REALLY need to try before the challenge begins on Monday, so I'll get the ingredients for those as well.

In case it doesn't sound like I'm on board, I really am. In fact, yesterday as I was looking through the fruit and vegetable drawers to see what we'd need for the week ahead, I found the remainder of the fresh basil I'd purchased for the lasagna I made during the week, as well as half a bag of baby spinach. Instead of letting them go bad, I decided to whip up a batch of pesto. I'll probably end up using it next week for one of our meals. Or else I'll freeze it.

Friday, January 15, 2010

Homemade Chicken Stock


The pot is ready to simmer on the stove.


The final product: 15 cups of delicious homemade stock.

I make lots of soups and other dishes that call for chicken stock, and I most frequently take the easy way out and buy a box of Emeril's or Whole Foods Chicken Broth. But when I saw Perdue meaty roasters on sale for 99 cents/lb., I thought I'd make some chicken stock. Like many of you, my vegetable drawer is full of odds and ends so I didn't have to buy anything else to make my stock. In addition, though the ingredient list looks long, it takes all of 6 minutes to roughly chop the vegetables and toss everything in the pot. My 12-year-old actually did most of the work, though she refuses to touch raw poultry, so I had to do that part.

After simmering for a few hours, I cooled and strained the stock. Then I placed it back in the stockpot and refrigerated it overnight.

The next day, I skimmed the fat off the top and packaged it in 1-cup containers. Why 1-cup? Partly because this was the only size I had, and partly because I planned to freeze the stock, and thought it would be easy to defrost just the amount I need at any given time.

This stock will certainly come in handy next week, when I'm taking part in Garden Grocery Gadget Girl's "Pantry Throwdown" - cooking only from the pantry, fridge and freezer all week.

Homemade Chicken Stock
Makes about 15 cups

2 extra meaty roasters, about 5# each (or any combination of chicken parts)
2 large onions, unpeeled and quartered
4 carrots, unpeeled and halved
2 stalks of celery, cut in thirds
20 sprigs of parsley
15 sprigs of thyme
10 sprigs of dill
1 head garlic, unpeeled and cut in half crosswise
1 1/2 T. kosher salt
1 1/2 t. whole black peppercorns
5 quarts of water

Place all of the ingredients in a very large stockpot. Bring to a boil over high heat. Skim any foam that comes to the surface, lower the heat and simmer for 4 hours.

Strain the contents of the pot through a fine mesh colander, discarding the solids (this did seem like a big waste of chicken to me, so we saved some of that and ate it). Refrigerate the stock overnight. The next day, remove the fat from the surface and discard. Pack the stock in containers and store in the fridge or freezer.

Stock will last for 5 days in the fridge and 6 months in the freezer.

Recipe adapted from Barefoot Contessa Back to Basics.

Wednesday, January 13, 2010

Sausage and Three-Cheese Lasagna


This lasagna was sooooo delicious I had to abandon the dirty dishes in favor of blogging. Can you blame me?

Let me start from the beginning. On my way out the door this morning, I flashed a few pages of Food and Wine by my husband and asked which pasta dish he'd like for dinner. He choose this one. He likes any food with the word "lasagna" in it.

The only reason I even considered making this dish is that it lacks ricotta cheese (the kids and I do not like ricotta). Instead, this version relies on a combination of fresh mozzarella, fontina and Parmesan for its cheesiness. Add in some fresh basil, tomatoes, garlic and sausage, and I thought it sounded pretty good.

Hubby, however, didn't realize this wasn't your run-of-the-mill lasagna, and looked a bit downcast when I served him. He picked through it and mumbled something about the fact that he likes his lasagna big, square and greasy. Then he finished his piece and went for seconds.

To me, this was a great dish because it was packed with flavor and each ingredient shone. If you love spicy food, add crushed red pepper to the sauce or use a spicy sausage. The F&W instructions were kind of convoluted, so I rewrote them as I went and will share with you below.

Then, I've got to get to those dishes.

Sausage and Three-Cheese Lasagna
Serves 6

1/2 pound lasagna noodles (I used 9 DeCecco lasagna noodles)
3 tablespoons extra-virgin olive oil
1/2 pound sweet Italian sausage (I used chicken sausage)
1 cup water
4 large garlic cloves, thinly sliced
One 28-ounce can chef's cut tomatoes
Salt and freshly ground pepper
Freshly grated Parmigiano-Reggiano cheese
1/2 pound fresh mozzarella, sliced
6 ounces Italian Fontina, sliced
6 basil leaves

In a large pot of boiling salted water, cook the lasagna noodles until almost tender, about 5 minutes. Drain, rinse with cool water, and transfer the noodles to a sheet of wax paper or aluminum foil that you've sprayed with cooking spray. Set aside until needed.

In a large skillet, heat 1 tablespoon of the olive oil. Add the Italian sausage, cover and cook over moderate heat, turning once, until browned all over. Add the water, cover and simmer until the sausage is just cooked through, about 4-6 minutes. Remove the sausage and water and reserve in a bowl or container.

Heat the remaining 2 tablespoons of olive oil in the skillet. Add the garlic and cook over low heat until golden, about 3 minutes. Add the tomatoes with their juices and cook over moderate heat for 10 minutes, stirring occasionally and breaking up the larger pieces of tomatoes. Add the sausage and its poaching liquid and simmer for 4 minutes. Remove the sausage to the bowl. Simmer the sauce over moderate heat until thickened, about 12 minutes. Season with salt and pepper.

Coarsely break up or slice the sausage.

Preheat oven to 425 degrees. Grease a 9-by-13-inch ceramic baking dish.

Lay 3 lasagna noodles in the dish. Spoon a scant 3/4 cup of the tomato sauce over the lasagna noodles and sprinkle with a little grated Parmigiano-Reggiano cheese. Scatter almost half of the mozzarella and half of the fontina on the noodles. Scatter half of the sausage on top of the cheese. Repeat the process with the remaining lasagna noodles, tomato sauce, mozzarella, Fontina and sausage, sprinkling with a little more Parmigiano-Reggiano cheese. Place a third layer of noodles on top, pour the remaining sauce on, and top with a sprinkling of Parmigiano-Reggiano and any remaining mozzarella cheese.

Bake the lasagna for 20 minutes, until the sauce starts to bubble. Raise the oven temperature to 450° and bake for about 7 minutes longer, until the top is richly browned. Let the lasagna rest for about 10 minutes, then cut the basil with kitchen shears and scatter on top. Cut into squares and serve.

Make Ahead
The unbaked (or baked) lasagna can be refrigerated overnight.

Sunday, January 10, 2010

Sunday Dinner


Little did I know that this dinner would be such a hit. It wasn't the best thing I ever made (though one of my critics said so!); I think there's something about the family sitting down to a home-cooked meal on a Sunday night that makes everyone happy.

The weekend, like so many others, started out with TS asking if he could have a couple of friends over on Friday afternoon, which morphed into 5 guys hanging out until mid-day Saturday. No sooner had they left than it was time to get my DD to a friend's house to rehearse for the school talent show. That left the guys and I to figure out what to do for dinner. I was outnumbered and wings at the Chicken Bone Saloon was the decision.

We finally all sat down together tonight and enjoyed this dinner of Roasted Chicken, Risotto and Roasted Butternut Squash Salad with Warm Cider Vinaigrette. The roasted chicken is a tried and true recipe that I hadn't prepared in a while. The risotto came together quickly in the pressure cooker, and I made the salad in stages during the day - roasting the squash and toasting the walnuts in the morning; making the dressing and shaving the parmesan cheese while dinner was cooking. The salad was definitely the most time-consuming part of the meal, but I was dying to try the recipe (click here), ever since I saw it in the Barefoot Contessa's Back to Basics cookbook I received as a Christmas gift. A simpler option would be steamed broccoli or spinach.

Do you and your family have a Sunday Dinner you love? I'd love to hear about it. If not, try this one and see what you think.

Crispy Roasted Chicken
Serves 4 - 5

1 4- to 5-pound whole chicken -- rinsed
2 teaspoons salt
1 teaspoon paprika
1/2 teaspoon onion powder
1/2 teaspoon thyme
1/4 teaspoon cayenne pepper
1/4 teaspoon white pepper
1/4 teaspoon garlic powder
1/4 teaspoon black pepper
1 large onion -- peeled and quartered
1/4 cup white wine or chicken broth

Preheat oven to 400 degrees.

Combine all spices (salt through black pepper) together in a small bowl. It's OK if you don't have one of them, or don't care for one of them. Either leave it out or substitute something else. Rub the mixture under the breast skin, then on top and sprinkle any leftover on the legs and in the cavity.

Place the quartered onion in cavity. Tie legs if desired. Place chicken in small oven-proof dish. Pour wine (or broth) around chicken. Turn chicken BREAST SIDE DOWN and roast at 400 for 30 - 40 minutes.

Turn over, baste and continue to roast for 45 - 50 min., basting occasionally, until chicken is 165 degrees in thigh. Let rest at least 10 minutes before carving.

Friday, January 8, 2010

Spice-Rubbed Lemon-Barbecue Salmon


If you're unsure about cooking seafood, here's a foolproof way to make a delicious salmon dinner in a matter of minutes. Once upon a time, I wasn't sure about how to cook seafood, but after realizing it's about as easy as boiling water for a pot of pasta, I'm happy to make fish or shellfish any day of the week.

I made a sweet barbecue glaze for the salmon. You could also do something creamy, like a lemony-mayonnaise. Use this recipe as a guideline, and I guarantee you won't be disappointed.

Tonight I served the salmon with a side dish of taboulleh, which I purchased at Whole Foods earlier in the week. Rice, steamed vegetables or even coleslaw would be great accompaniments to this dish.

Spice-Rubbed Lemon-Barbecue Salmon
Serves 2 (can be doubled)

Two 6-ounce salmon fillets, patted dry
Barbecue seasoning of your choice (I used something called Buzz Rubb, which includes brown sugar, salt and spices)
Kosher salt or sea salt
2 T. barbecue sauce
1 T. hoisin sauce
2 T. honey
1/2 lemon, zested
2 lemon wedges

Place the salmon fillets on a greased, foil-lined baking sheet. Rub the tops with the barbecue seasoning. Let sit for 10 minutes while you preheat the broiler.

Place the salmon fillets 4" - 6" from the heating element and broil for 6 - 8 minutes, until cooked through. Remove from the broiler and let sit 5 minutes.

Combine the sauce ingredients (barbecue sauce, hoisin sauce, honey and lemon zest) in a small bowl. Spoon the sauce into a small ziplock bag and squeeze down to the corner of the bag. Cut off a very small portion of the corner of the bag and squeeze the sauce generously over the salmon. Serve with a lemon wedge. (If you're not feeling all that artistic, just prepare the sauce and serve it alongside, or on top of, the salmon.)