Monday, February 22, 2010

Pasta Bolognese


Bolognese is a meat-based sauce made with carrots, onions, celery, beef broth, tomatoes and milk or cream and is typically served over a flat, wide pasta such as tagliatelle.

This version comes from my new friend, Cook This, Not That. The authors have slimmed down the traditional recipe by using lean meats and low-fat milk. A slow simmer gets it nice and thick and perfect for using on your favorite fresh or dried pasta, or even polenta. It would also make a very tasty meat sauce for a lasagna or baked ziti dish.

While it's not a diet food by any stretch of the imagination, this hearty homemade sauce deserves a place in your dinner rotation.

Pasta Bolognese
Serves 6 - 8

1 T. olive oil
3 cloves garlic, minced
1 medium carrot, diced
2 stalks celery, finely chopped
1 medium onion, diced
6 oz. ground turkey
6 oz. ground pork
6 oz. ground sirloin
1 can (28 oz.) diced tomatoes (I used crushed tomatoes)
2 T. tomato paste (I used tomato paste with Italian herbs)
1 cup reduced-sodium beef broth
1 cup low-fat milk
2 bay leaves
salt and pepper to taste
1 package fresh fettucine (or more)
fresh grated Parmesan cheese

Heat the oil in a large nonstick skillet over medium heat. Add the vegetables and saute until cooked through, about 5 minutes. Add the meat and stir with a wooden spoon until the meat is broken up and no longer pink.

Drain any accumulated fat from the pan. Add the tomatoes, tomato paste, beef broth, milk and bay leaves. Bring to a boil. Turn down the heat and simmer the sauce for at least 30 minutes (and up to 2 hours), until the sauce has thickened. Season to taste with salt and pepper and keep warm while you prepare the pasta.

Top the cooked pasta with the hot sauce. Serve sprinkled with the Parmesan cheese.

Sunday, February 21, 2010

Lean Eggs and Ham


Whether it's breakfast for dinner, brunch or, well, breakfast, you can't go wrong with this lean version of an egg sandwich. Picky teenage son chose this as one of his two selections from Cook This, Not That. I think you can see the corner of the book in the picture, as a matter of fact.

This is the book's version of Denny's "Belgian Waffle Slam" which boasts 940 calories and 53 grams of fat, not to mention setting you back $6.79. The Cook This version is all of 270 calories, with 11 grams of fat and a cost of under $1 per serving.

We all gave it two thumbs up.

Waffles with Ham and Egg
Serves 4, easily adjustable to serve 1 - 100

4 slices Canadian bacon or deli ham
1 T. butter (my addition to the recipe)
4 large eggs
salt and pepper
4 frozen whole grain waffles
2 T. pure maple syrup
4 T. shredded sharp cheddar cheese
fresh chopped parsley (optional)

Heat a large nonstick skillet over medium heat. Add the ham and cook briefly on each side, just to heat through and get a little brown. Remove the ham to a plate. Add butter to the pan. When it melts, crack 4 eggs around the edge of the pan, using a spatula to keep them from colliding. Let cook for a couple of minutes. Sprinkle with salt and pepper and flip the eggs. Cook to your desired degree of doneness (we all like them cooked through).

In the meantime, toast the waffles or place in a 350 oven for about 10 minutes until hot and crisp. Top each waffle with one slice of ham, a drizzle of maple syrup, a sprinkle of cheese and the warm fried egg. Sprinkle with parsley if desired, and serve with some fruit salad.

Friday, February 19, 2010

Chicken Pot Stickers


True confession:

There's a nice Barnes & Noble near my kids' school, and now and then I purposely leave the house early so I can stop and browse before I pick them up. Each time, I solemnly swear that I will NOT buy a cookbook or cooking magazine. And each time, I walk out with a cookbook or a cooking magazine. Sometimes both.

I recently purchased Cook This, Not That, which caught my eye because it features healthy spins on all sorts of favorite restaurant-type foods, from burgers to breakfast sandwiches to pasta dishes to comfort foods. My clients and my family love this kind of food, and a little extra inspiration never hurts (at least that was my justification for buying the book).

Last week, I asked my 2 kids and husband each to flag two recipes they'd like to try in the book. This is the family that really could care less what's for dinner, as long as it's vaguely familiar, lukewarm and ready to eat at 6:15 pm.

To my surprise, they flagged 13 recipes. Tonight I was inspired by the recipe for Chicken Pot Stickers from the Appetizers and Small Bites chapter. I wanted to bring a platter of something special to a cocktail party, and this was a big hit! I have put several more recipes from the book on our family menu for the upcoming week, so stay tuned for more tasty results.


Chicken Pot Stickers
Makes a big platter

1 bag frozen pot stickers (about 24 pot stickers; I got mine at Trader Joe's)
4 tsp. dark sesame oil, divided
2 tsp. canola oil
1 bag sugar snap peas (I use Mann's, found fresh in the produce section; they're already washed and strings removed)
2 T. hoisin sauce
1 T. soy sauce
1 T. rice vinegar
squirt of sriracha sauce
sesame seeds, optional

Cook the pot stickers in a big pot of boiling water until they float to the top, about 3 - 5 minutes. You don't want them completely cooked and mushy, but on their way to cooked. Drain and pat dry.

Heat 2 tsp. of sesame oil and 2 tsp. of canola oil over medium-high heat in a large nonstick skillet. Place the pot stickers in the pan and let cook for about 3 minutes per side, or until the sides are nicely browned.

Meanwhile, place the sugar snap peas in a glass bowl, cover with plastic wrap, and steam in the microwave for 1 minute. Remove plastic wrap. Toss browned pot stickers with sugar snap peas and 1 tsp. sesame oil in the bowl.

Make a dipping sauce by combining the hoisin, soy sauce, rice vinegar, sriracha and remaining teaspoon of sesame oil (or use any store-bought sauce you have around). Place the pot stickers and sugar snap peas on a platter, with the dipping sauce nearby (or toss them with the sauce and place on platter). Garnish with sesame seeds.

Recipe adapted from Cook This, Not That.

Thursday, February 18, 2010

Fish in a Flash


I don't seem to slow down all day, and my lastest quest is getting meals on the table fast. This dinner delivered, taking all of 5 minutes prep time this morning before I headed out the door and then 10 minutes start to finish this evening. You could prep the fish at dinner time; I happened to have a free moment this morning, so I got it ready then. I guess it helped that I had a bag of fresh breadcrumbs in the freezer, but if you don't, use some plain panko instead.

Fresh fish is the key to any successful fish dish, I've found. I'm lucky to live in a region where fresh fish is always available (though I see plenty of frozen fish in the market as well). I have tried both (side-by-side in some instances), and frozen fish doesn't hold a candle to fresh. I'm not talking about shellfish; I'm talking about fin fish, such as cod, haddock, tilapia, sea bass and salmon. Please don't buy them frozen if you can help it. They just don't taste as good, and may very well be the reason you think you don't like fish.

Tonight's dinner featured tilapia. In the time it took to preheat the oven and roast the fish, I cooked a cup of whole wheat couscous on the stovetop and steamed a bag of spinach in the microwave. I combined both of those with some dried seasonings for our side dish, and dinner was served.

Caesar-Baked Fish
Serves 3

3 tilapia fillet -- or cod or haddock
3 tablespoons mayonnaise (I like the olive-oil mayo)
3 tablespoons fresh grated Parmesan cheese
1/2 lemon -- zested
1/2 teaspoon salt -- or to taste
dash ground black pepper
3/4 cup fresh breadcrumbs
lemon wedges to serve

Preheat oven to 450 degrees.

Place fish fillets in a greased baking dish.

Combine mayonnaise, Parmesan, lemon zest, salt and pepper. Spread over fish fillets. Top with breadcrumbs. (This step can be done hours ahead. If making ahead, cover with plastic wrap and refrigerate until ready to bake.)

Bake about 10 minutes, or until fish flakes easily and crumbs begin to brown. Serve with lemon wedges.

Wednesday, February 17, 2010

Turkey Sausage-Stuffed Manicotti


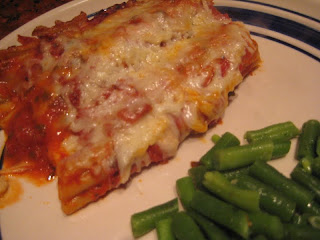
Judging from the title and the picture, you would probably believe me when I told you that this manicotti is delicious (it's true). You might even believe me if I told you that this dinner is much more healthful than anything you'd get at a restaurant (making healthy versions of favorite foods is my specialty). But I'm sure you wouldn't believe me if I told you how incredibly simple it is to prepare Sausage-Stuffed Manicotti. The only dish or utensil involved in the preparation is one casserole dish. Read on, and become a believer.

Turkey Sausage-Stuffed Manicotti
Serves 7

1 25 ounce jar marinara sauce -- I used Whole Foods 365 Tomato-Basil Sauce
1/2 cup water
8 ounces manicotti -- uncooked (1 box)
1 1/4 pounds turkey sausage -- I used Turkey Store Sweet Italian Sausage
1 cup part-skim mozzarella cheese
1/4 cup grated Asiago cheese (Parmesan would be good, too)

Preheat oven to 350 degrees. Spray a 9x13 casserole dish with nonstick spray. Pour 1 cup of sauce onto the bottom of the pan.

Add 1/2 cup water to remaining sauce in the jar. Replace lid and shake to combine.

Remove casings from the sausages. Take approximately 1/3 of one sausage link and roll it into a skinny tube in your hands. Gently insert it into the uncooked manicotti shell. Place the shell in the pan. Repeat the process until you've used all the shells and sausage; you should have 14 filled shells.

Pour the remaining sauce on top of the manicotti. Cover with foil and bake for 1 hour and 15 minutes. Remove foil and top the manicotti with both cheeses. Return to the oven for 8 - 10 minutes, until cheeses are melted and manicotti is tender. Remove from oven and let stand for 10 minutes before serving.

Sunday, February 14, 2010

Cape Cod Lollicakes


As much as I wish I could pull off a cute dessert like this, there's really no way that's happening in my kitchen. Last time I had friends over, I had a bowl of M&Ms for dessert. That's about as good as it gets around here, dessert-wise.

So I ordered a dozen "lollicakes" (cake on a stick) from Cape Cod Lollicakes for my husband for Valentine's Day. He loved the presentation, and offered us each one. The chocolate covered lollicakes have a cookie dough cake filling; the pink covered lollicakes have a chocolate cake filling. These pops contain some of the tastiest cake you've ever had. Highly recommended. The only problem is, he's not willing to sharing the rest. :-(

Friday, February 12, 2010

Round 2: Tilapia with Tomato-Olive Sauce


Cooking once and eating twice is always smart. Sometimes I plan to do so: I'll grill or bake extra protein and serve it again another night in a pasta dish, salad or quesadilla. Sometimes I don't plan, but it just happens, like when I made the roast beef. We had some leftover, so I incorporated into a fried rice entree a couple of days later. Last night was one of those "didn't plan it that way" nights.

The polenta and sausage from Wednesday's dinner were long gone, but I still had a cup or so of the chunky tomato-vegetable sauce. I hadn't served served fish this week, and I thought the sauce would go really nicely with almost any white fish or even shrimp. So I stopped in at Shaw's on my way home from work and picked up some tilapia fillets along with a scoop of pitted kalamata olives. I also should have bought some fresh parsley; I could have sworn I had some here, but I guess not.

At home, I put the olives in the sauce and sliced them a little bit with a dinner knive and fork (I really didn't want to dirty a cutting board - you know the feeling, right?). I set it in a little saucepan over low heat while I made the fish.

After seasoning the fish with salt and pepper, I heated a little olive oil in a nonstick skillet, sauteed the fish for a couple of minutes on each side, topped it with the newly olive-infused sauce, and wished I had some fresh parsley to scatter over the entire creation. Served with rice and (leftover) broccoli, it was a fantastic, easy weeknight meal.

Wednesday, February 10, 2010

Polenta with Chicken Sausage and Tomato-Vegetable Sauce


This happy accident had my critics going back for seconds (all except Picky Teenage Son, who got up only to get a yogurt from the fridge). Getting PTS to go back for seconds of anything is like pulling teeth, which made me think the old Trident gum phrase, "3 out of 4 dentists surveyed recommend Trident for their patients who chew gum." Well, 3 out of 4 of my family members recommend this dish.

My dinner plan involved using a roll of polenta I'd picked up at Trader Joe's along with the al fresco chicken sausages that were on sale at Roche Bros. this week. I figured I'd need a sauce, so I opened the veggie drawer and pulled out half an onion, half a bell pepper and a portobello mushroom cap, sauteed them with some garlic, added a can of tomatoes and some seasonings, and dinner was ready.

Polenta with Chicken Sausage and Tomato-Vegetable Sauce
Serves 3 - 4

2 - 4 T. olive oil, divided
about 1 cup of chopped vegetables, such as onion, bell peppers, mushrooms and/or zucchini
2 cloves garlic, minced
splash of white or red wine
1 can petite diced tomatoes with garlic and olive oil
1 tsp. dried Italian seasoning
salt and pepper
1 tube polenta, sliced into 10 - 12 rounds
1 package al fresco chicken sausage (fully cooked), I used the spinach and feta flavor
freshly grated parmesan or asiago cheese

Heat about 2 T. oil in a large skillet over medium heat. Saute the vegetables until they begin to soften, about 5 - 8 minutes. Add the garlic and cook 1 minute longer. Add a splash of wine if you'd like, and stir around to scrape up any bits that are beginning to stick to the bottom of the pan. Add the can of tomatoes with their juices and the Italian seasoning, and let the mixture simmer for about 10 minutes. Taste and add salt and pepper as needed. Keep warm, or set aside and rewarm before serving. (Sauce can be prepared hours ahead of time.)

About 15 minutes before serving, preheat the oven to 325 degrees and heat a grill pan or large skillet over medium-high heat. Brush one side of polenta with olive oil. Place oiled side down in pan and cook for about 3 minutes, or until grill marks or light brown color appear. Brush tops with oil and flip. Cook 3 - 4 minutes longer. Place polenta on a baking sheet and keep warm in oven. Use the same pan to heat your sausage, flipping once a couple of minutes through.

Place three pieces of polenta on each plate. Top with several sausage slices and a couple of spoonfuls of sauce. Top with shredded cheese and serve.

Monday, February 8, 2010

Scrappy Fried Rice


Use it or lose it, I said to myself, as I stared at half a roast beef in the fridge, leftover from Saturday night's dinner. I couldn't let it go to wa$te, but I was really not in the mood for roast beef sandwiches or some other heavy concoction. So I got into the bathtub for a good soak and let my thoughts wander. They wandered to fried rice.

Fried rice can be made any day of the week. All you need is rice, soy sauce, a couple of eggs and whatever scraps of vegetables and/or meat you have lying around. Use what you've got; it will turn out great.


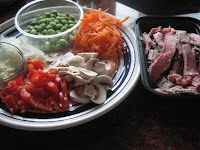
The raw ingredients for tonight's meal

Scrappy Fried Rice
Serves 4

3 - 4 cups cooked white or brown rice
1 - 2 T. vegetable oil
2 cloves garlic, minced
fresh ginger, minced (if you have it; I didn't)
vegetables of choice, sliced small and thin - I used shredded carrots, sliced onion, sliced red bell pepper, sliced mushrooms and edamame
4 - 8 oz. cooked chicken, shrimp, beef, pork or tofu
2 T. soy sauce
2 eggs, lightly beaten
1 T. sesame oil
sesame seeds, sliced scallions or chow mein noodles for garnish

Either use leftover white or brown rice, or cook up some rice anytime during the day to use for this dish.

Heat oil in a large skillet or wok over medium-high heat. Add garlic and ginger and stir for 30 seconds. Add all the other vegetables and stir fry for 3 - 4 minutes, stirring constantly. Add in the cooked rice and stir together with the vegetables. Add the soy sauce (use more if necessary) and stir to incorporate. Add the cooked meat or fish and stir to combine. Press down on the rice mixture with your spatula and let it cook, undisturbed, for a couple of minutes, to get the bottom crisp.

Make a well in the center of the rice in the skillet. Pour in the two beaten eggs and scramble gently. When cooked, incorporate the eggs into the rice mixture. Again, press the mixture down in the pan. Turn off the heat and let sit for a minute or two to crisp the bottom again. Drizzle with sesame oil, garnish and serve.

Sunday, February 7, 2010

Popovers


The first time I made popovers with my kids, about 10 years ago, they were quite impressed with the results. "These are like something you'd get at a fancy breakfast place," the older one exclaimed, though I couldn't recall ever taking him to a fancy breakfast place. Maybe he'd been imagining such an outing. My youngest just said, "'Nuther pop-up please," which was good enough for me.

I'd kind of forgotten about popovers until Saturday night, when I decided to make some to go with a roast beef. Believe it or not, I had never prepared a roast beef before, so I was quite fixated on the details of the big hunk o' meat (it came out quite well, thank you!). When I told my chef friends about the meal, each one of them related a popover horror story, or simply congratulated me on making popovers. And I thought roasting the beef was the tricky part!

So for anyone out there who's afraid of making popovers, here is the world's easiest recipe, from Pretend Soup, a children's cookbook by Mollie Katzen.

Popovers
Makes 11 or 12

2 T. melted butter
1 cup milk
2 large eggs
1 cup flour
1/4 teaspoon salt

Preheat oven to 375 degrees.

Brush the insides of 12 muffin cups with the melted butter.

Mix the milk and eggs together with a whisk in a large bowl. Add the flour and salt and whisk until combined; it doesn't have to be perfect.

Use a 1/4 cup measuring cup to pour the batter into each muffin cup. Bake for 30 minutes WITHOUT OPENING THE OVEN DOOR!

Take the pans out of the oven and pierce each popover with a fork to let the steam escape. In a minute or two, gently loosen the popover from the muffin cup and serve with butter, jam or syrup.

White Bean and Artichoke Casserole with Goat Cheese


Cold winter night. Delicious vegetarian casserole. I don't have much more to say, except open a bottle of wine and enjoy!

Thanks to Christine for the recipe and inspiration. (I tweaked the recipe a bit; couldn't resist.)


White Bean & Artichoke Casserole with Goat Cheese

Serves 4 as a main dish

2 cans cannellini beans -- drained, rinsed, liquid saved
2 tsp. chopped fresh thyme
1/2 tsp. dried sage
1/4 tsp. pepper
kosher salt to taste
4 cloves garlic — minced
1/2 cup crumbled goat cheese (use even more if you LOVE goat cheese)
about 4 T. olive oil — divided
3 large leeks -- white part sliced very thin
1/4 tsp. salt
2 cans quartered artichoke hearts -- drained and rinsed
1/2 cup Panko bread crumbs

Preheat oven to 425 degrees. Add enough water to reserved bean liquid to measure 1 cup. Set aside.

Combine beans with thyme, sage, pepper, salt and 1 garlic clove. Mash lightly with a potato masher; beans should be just a little smooshed. Spread half of the bean mixture in a greased 11x7 casserole dish. Top with half of the goat cheese, crumbled. Drizzle with a bit of olive oil. Set the rest of the beans and goat cheese aside for a moment.

Heat 2 T. oil in a large skillet over medium heat. Add three garlic cloves, leeks, salt and artichokes. Sauté 4 minutes. Stir in bean liquid, cover, reduce heat and simmer for 8 - 10 minutes, stirring occasionally. Remove from heat.

Spread artichoke mixture over the bean and goat cheese layers in the casserole. Top with the remaining bean mixture and the remaining goat cheese. Combine bread crumbs and 1 T. olive oil and sprinkle over casserole. Bake at 425 for 10-15 minutes or until lightly browned.