Friday, July 31, 2009

Vegetable Enchiladas


Today's lunch was Vegetable Enchiladas, which really hit the spot on this rainy afternoon. I love experimenting with vegetable entrees, and this one's a keeper. I believe this recipe originally appeared in the magazine Everyday Food. A fellow personal chef brought it to my attention, and I thought about making it today because I was pretty sure I had everything I needed in the fridge and pantry. Don't you love it when that happens?

I used leftover corn on the cob from last night as well as an opened can of beans from Wednesday's Taco Night. I'm sure I didn't use 3 cups of cheese; I'm just not that into cheese. But you go ahead and use as much as you like.

The recipe makes eight hefty enchiladas; if you don't need that many, the easiest thing to do is make the full batch but divide it between two 8x8 dishes. Bake one dish now and freeze one for another time.

Vegetable Enchiladas
Serves 8

2 tablespoons olive oil
1 teaspoon ground cumin
1/4 teaspoon hot chili powder -- more or less, to taste
1/4 cup all-purpose flour
1/4 cup tomato paste
1 can reduced-sodium vegetable broth -- (14 1/2 ounces)
Coarse salt and ground pepper
3 cups grated Jack cheese (I used soy cheese. Any cheese you like is fine here)
1 can Kuner's Seasoned black beans -- (15 ounces)(if you can't find this brand, use plain old black beans and add some cumin and chili powder to the mix)
1 box frozen chopped spinach -- (10 ounces) thawed and squeezed dry
1 box frozen corn kernels -- (10 ounces) thawed, or corn cut from 4 - 5 ears of corn
6 scallions -- thinly sliced, white and green parts separated
8 corn or flour tortillas

Make sauce: In a medium saucepan, heat oil over medium. Add cumin, chili powder, flour, and tomato paste; cook, stirring, 1 minute. Whisk in broth and 3/4 cup water; bring to a boil. Reduce to a simmer, and cook until slightly thickened, 5 to 8 minutes. Season with salt and pepper, and set aside.

Make filling: In a large bowl, combine 2 cups cheese, beans, spinach, corn, and scallion whites; taste and season with salt and pepper.

Lightly oil two 8-inch square baking dishes; set aside. If using very stiff tortillas, stack them up, wrap in damp paper towels and microwave on high for 1 minute to make them more pliable (or stack and wrap in aluminum foil, and heat in oven for 5 to 10 minutes). Top each tortilla with a heaping 1/3 cup of filling; roll up tightly and arrange, seam side down, in prepared baking dishes.

Dividing evenly, sprinkle enchiladas with remaining 1 cup cheese, and top with sauce.

Either bake or freeze. To bake, place uncovered pan in preheated 400 degree oven until hot and bubbly, 15 to 20 minutes. Cool 5 minutes; serve garnished with scallion greens.

To freeze, wrap tightly and freeze. Thaw completely in the refrigerator overnight and then bake as directed above.

Thursday, July 30, 2009

Wild West meets Metro West


Guys, if you live around here and you're looking for a really delicious hamburger (or grilled chicken sandwich), have I got the place for you.

Wild Willy's Burgers in Worcester serves the absolute best burgers around! Fellow blogger Ellen Allard piqued my curiosity with this post. Hubby and I tried the place a few weeks ago and couldn't wait to bring the kids when they got home from camp. So last night, the four of us, plus two of TS's friends, piled in the Pilot and went to Worcester for burgers.

(Here we have a few members of the happy group, in between bites. Picture was taken with my Blackberry, so please excuse the quality.)

I had the "Rustler" again - a grilled chicken breast with barbecue sauce, lettuce and tomato. (I confess, I don't really like hamburgers, though one of these days I'm going to try Wild Willy's Bison Burger, just to say I did.) The rest of the table had burgers in various forms (bacon, cheese, onions), plus of course fries, onion rings and pickles. The final word: "Best burger I ever ate" said TS (and he should know; that guy eats a burger every time we eat out anywhere).

One last thing: Wild Willy's is NOT upscale. You walk in, stand in a corral-type line, look at the menu on the wall, order and pay. Then you take a gigantic playing card to your booth and display it so the server can find your table when your food comes out 10 - 15 minutes later. The decor is Wild West-meets-Metro West, with wooden booths, a sticky-handled self-serve pickle barrel and paper food wrappers.

Wednesday, July 29, 2009

Cookdate pictures


My pictures lately have been pretty blase, so I thought I'd add a little color to the blog with a couple of photos I took at yesterday's cookdate.

The top picture is Grilled Sweet Potatoes and Scallions. The one underneath is my favorite Rum-Glazed Shrimp and Mango Kebabs (recipe here).

Grilled Sweet Potatoes and Scallions
Serves 4 - 6

1 1/2 pounds sweet potatoes -- peeled, sliced into small wedges
6 cloves garlic -- smashed with side of knife but left relatively intact
1 tablespoon fresh thyme
3 tablespoons olive oil
salt and pepper
1 bunch scallions -- tops and tails trimmed
sea salt

Combine sweet potatoes, garlic and thyme in a large bowl. Drizzle with oil and season with salt and pepper. Toss to combine. Place on a baking sheet that's covered with a sheet of heavy-duty aluminum foil and roast for 20 minutes at 425, stirring occasionally. The potatoes should be almost cooked through.

Remove from oven, toss again, lay scallions on top and bring the entire tray out to the grill.

Place scallions and sweet potato slices on the grill and grill about 2 minutes per side, or until grill marks appear. Chop scallions into 2" lengths. Place all of the vegetables back on the foil with the garlic and toss. Season with sea salt.

Saturday, July 25, 2009

Pantry Chili


It's been an interesting week. TS returned home from camp a week early with a virus; DD returned from camp on time but was not thrilled to see TS camped out on the couch getting all of the attention.

So I divided my time this week working, attending to TS (from now on known as Virus Boy) and trying to get DD out of the house to do something fun. Some days were better than others, and I'll just leave it at that.

Anyhow, last night, VB's appetite returned from out of nowhere with a vengeance. At 5:30 he hoarsely announced from his spot on the couch, "I want spicy meat for dinner." Of course, I had a turkey breast in the oven, which didn't qualify as "spicy meat". I really wasn't in the mood for plain old turkey anyway. I decided to carve that up and freeze it for the future.

As I scrambled around looking for inspiration on the "spicy meat" front, DD put on a pout because I had promised her she could have her favorite vegetable, a baked potato, with the turkey breast, and she thought that plan was now ruined.

My choices were a bit limited, but I knew I had some ground turkey in the freezer. "How about some chili?" I asked the kids. To my great surprise and relief, DD answered, "I love chili" (how did I not know this after 12 years?) and VB said, "Can you make it extra spicy?" I assured him I could, and told her that chili is delicious on top of a baked potato, which made her happy.

I didn't have any tomato products in the pantry except for one can of diced tomatoes, which I ruled out because DD doesn't like any chunks of tomatoes in her sauces. I thought I'd wing it and use a jar of Newman's Own Marinara sauce, along with some chili spices, and see how it went. In the time it took the potatoes to bake in the oven, we had a respectable little pot of chili. Ole!

Pantry Chili
Serves 4

1 - 2 T. olive oil
One half onion, chopped fine
Two cloves garlic, chopped
1 lb. ground turkey (dark meat) or lean ground beef
1 can Chili Beans (essential ingredient - lots of flavor)
1/2 jar Newman's Own Marinara sauce (more or less)
1 cup water
1 T. regular chili powder
1 t. medium hot chili powder
1/2 t. ground cumin
shredded sharp cheddar cheese for topping

Heat oil in a Dutch Oven over medium-low heat. Add onion and garlic and slowly saute until soft, about 8 minutes. Add turkey, increase heat to medium, and brown completely. Drain off excess fat. Stir in one can of Chili Beans (undrained), sauce, water and seasonings. Simmer for 20 - 40 minutes. Ladle into bowls (or on top of baked potatoes) and top with shredded cheese.

Sunday, July 19, 2009

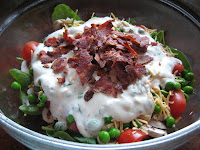
Layered Salad


This blast from the past is a refreshing make-ahead salad for your summer cookouts. Chances are your mother (or grandmother) made a salad like this: layers of lettuce or spinach, cheese, bacon and peas, all topped with a mayonnaise-based dressing and chilled overnight.

The 2009 version features more vegetables, a lighter dressing, and turkey bacon. And guess what? It's just as popular today as it was back then. I served this at a cookout with burgers, turkey sausage and chips.

Layered Salad
Serves 8 - 10

4 cups baby spinach leaves (one box)
1/2 cup shredded cheddar cheese
2 cups sliced fresh mushrooms
1/2 small red onion, sliced very thin
8 grape or cherry tomatoes, quartered
1 cup cooked green peas, chilled
1/2 cup light Ranch dressing
1/4 cup light mayonnaise
1/4 cup chopped fresh basil
4 strips turkey bacon, cooked and crumbled

Layer ingredients in a bowl as follows: spinach, cheese, mushrooms, onion, tomatoes and peas. Combine Ranch dressing, mayo and basil. Spread over top of salad. Cover and chill for 4 hours or overnight. Before serving, top with crumbled bacon. Serve.

Lucy's Pasta with Pesto


My daughter's home from camp, so I made one of her favorites for dinner last night. She has loved making and eating pesto since she was a little girl, and we've experimented with many recipes over the years to find the perfect pesto. This recipe, adapted from Cook's Illustrated, is her favorite.

Lucy likes her Pasta with Pesto straight up; I often add fresh tomatoes or chopped sun-dried tomatoes to my bowlful. I usually drizzle the cooked pasta with a bit of olive oil before adding the pesto, one spoonful at a time, until the noodles are coated to my liking. Depending on how much pasta you've cooked, there's a chance you'll end up with some leftover pesto. Not a bad thing!

If you have extra pesto, refrigerate it and use it the next day, spread on ciabatta for a summery sandwich of tomatoes and mozzarella. Thinned with a little olive oil, pesto makes a great dressing for an antipasto salad of arugula, tomatoes, olives and artichoke hearts. Or, if you're out of ideas (or food), freeze the pesto for another time.

Pesto
Makes about 1 cup, enough for 1 lb. of pasta

2 medium cloves garlic -- unpeeled
1/4 cup pine nuts
3 cups packed fresh basil leaves (about 4 ounces)
1 cup baby spinach (packed) -- about 1 ounce
salt and pepper
2 tablespoons fresh lemon juice from 1 lemon
1/4 cup extra virgin olive oil
1 1/2 ounces finely grated Parmesan cheese -- plus extra for serving
4-6 tablespoons mayonnaise

1. Bring a small saucepan of water to rolling boil. When water is boiling, add garlic and let cook 1 minute. Remove garlic with slotted spoon and rinse under cold water to stop cooking; set aside to cool. (If you plan to cook pasta at the same time, use a larger pot of water and cook the pasta in it after you're done cooking the garlic.)

2. When garlic is cool, press through garlic press into the bowl of a food processor. Add nuts, basil, spinach, salt, pepper, lemon juice, and oil to the bowl of food processor and process until smooth, scraping sides of bowl as necessary. Add cheese and mayonnaise and process until thoroughly combined. Transfer mixture to a small covered container. Refrigerate until ready to use.

Monday, July 13, 2009

Lettuce Wraps


Lettuce wraps hit the spot on a hot summer night, when you want something to eat but not too much. You might even find you have everything you need to make these in your fridge, especially if you've been cooking over the last couple of days and have a little of this and a little of that still hanging around. I bought the ground turkey and lettuce; everything else was already here.

Boston lettuce is the best for wrapping up these little bundles. You can use any protein (chicken, steak, tofu) and whatever vegetables you like. Fresh herbs such as mint or basil make the dish, as does a squeeze of lime over the mixture before you roll it up like a burrito and eat.

Lettuce Wraps
Serves 4

1 lb. ground turkey
salt and pepper
3 cloves garlic, chopped
1 tablespoon minced fresh ginger
pinch hot pepper flakes
2 - 3 cups of shredded or sliced vegetables, including peppers, scallions, cabbage, carrots, sprouts and/or snap peas
fish sauce, soy sauce, hoisin sauce, or plum sauce (or a combination)
One head of Boston lettuce, leaves separated, washed and dried
1/4 cup chopped fresh mint or basil
1 lime, cut into wedges

Cook turkey in a large nonstick skillet over medium heat until just about done, about 4 minutes. Drain excess fat. Season with salt and pepper. Add garlic, ginger, hot pepper flakes and vegetables and cook for 2 - 3 minutes, until vegetables begin to soften. Add a splash of fish sauce and a bit of soy or hoisin sauce and stir to combine. Taste and adjust seasonings as desired.

To serve, place a large spoonful of the turkey-vegetable mixture on a lettuce leaf. Top with fresh mint or basil and a squeeze of lime juice. Roll up and eat.

Saturday, July 11, 2009

Lattice-Topped Cherry Tart


To make up for last evening's lackluster meal, I decided to make a cherry pie for my husband this morning. Unfortunately, I didn't have quite as many cherries as I would have liked, so my pie became a tart, simply because the tart pan looked like it didn't require quite as much filling as my deep-dish pie pan.

First I pitted the cherries, which really was no big deal. I attempted to pit them with a paperclip, a la Martha Stewart, but that really didn't work. I ended up kind of squeezing each one and popping the pit out. Worked great.

Having never made a cherry pie before, I went to my Better Homes and Gardens Cookbook and followed their instructions, more or less. It was quite easy, and I highly recommend you make a tart (or pie) tonight for someone you love.

Lattice-Topped Cherry Tart
Makes 1 tart

3 1/2 - 4 cups fresh cherries, pitted (If you have 5 or more cups of cherries, by all means, make a pie)
1 cup white sugar
3 Tablespoons cornstarch
1 package of Pillsbury pie crusts or your favorite recipe for a double-crust pie
1 Tablespoon milk
coarse sugar for sprinkling on top

Mix the white sugar and cornstarch together in a bowl. Add the pitted cherries and stir. Let sit about 15 minutes, or until mixture gets kind of juicy.

Preheat the oven to 375 degrees.

While the cherries are getting juicy, place one pie crust in your tart pan. Slice the remaining pie crust into 10 strips. When the cherries are ready, stir them and pour them into the prepared pan. Place half of the strips on the pie from top to bottom, with about 1 inch inbetween strips. Fold every other strip back halfway. Lay another strip in the center of the tart, across the strips already in place. Unfold the folded strips and fold back the remaining strips. Place another pastry strip across the first set of strips, parallel to the strip in the center. Repeat the weaving until lattice covers the filling. Trim the pastry strips so they're even with the pan. Press them into the bottom crust to seal.

If you'd like, brush the milk on the lattice topping and sprinkle with coarse sugar before baking.

Bake the tart or pie on a cookie sheet in the oven for 45 minutes, or until the lattice top is light brown and the filling is bubbly. Let cool and serve.

Friday, July 10, 2009

Roman-Style Chicken


After seeing Giada DeLaurentiis prepare this on the Food Network, I thought I had to make it for myself. One of Giada's selling points of this recipe was that it tastes better if prepared ahead of time and heated up just prior to eating, making it a perfect recipe to add to my personal chef repertoire. So, earlier today, I prepared the dish, then cooled it and refrigerated it until dinnertime, when I heated it up on the stove.

Unfortunately, neither my husband nor I thought this was anything special. The combination of peppers, tomatoes, prosciutto, chicken, capers and broth was really not that flavorful in the end. The accompanying roasted potatoes with rosemary were quite good (I don't think there's any way to screw up a roasted potato). Since I took the picture, I thought I'd share it with you, in case you want to try it yourself, and also to prove that not everything I make turns out fantastic.

If you'd like the recipe, here's a link to it on the foodnetwork.com site.

Monday, July 6, 2009

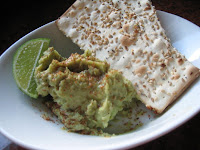
Avocado and White Bean Dip


My name is Martha, and I'm a snacker. Anyone who knows me will verify this. My usual snacks include nuts, soy cheese, crackers, pretzels, turkey, raisins, hard-boiled eggs, soy yogurt, fruit, and the occasional handful of Teddy Grahams. I try to keep it healthy but easy. A snack shouldn't require any more than 2 minutes to prepare, in my opinion.

Today I was feeling bored with my usual snacks and wanted something new. I like my snacks to be filling and nutritious, and with that in mind, I decided to make a dip by mashing together an avocado and a can of white beans (drained and rinsed). Good, but it needed a little zip, so I sprinkled the mixture with Penzey's Southwest Seasoning and a bit of lime juice. Snack time!

P.S. In case you were wondering, this dip is high in fiber, vitamins and minerals as well as heart-healthy monounsaturated fat. It's vegetarian, dairy-free, and inexpensive. Add grated onion or minced garlic for more oomph. Spread it on a wrap and add some raw vegetables or sliced turkey for a quick lunch. Mmmmm.